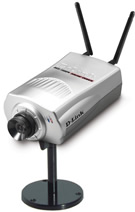
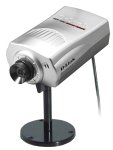
D-Link DCS-1000W Wireless Internet Camera
The DCS-1000W is a self contained camera allowing you to access a real-time video stream from anywhere via the Internet. Unlike webcams you may be familiar with, the DCS-1000W does not require a computer to operate, although one is needed to initially configure the camera. Since this camera is wireless, you can also integrate it into your 802.11 WiFi network so you can reposition it to new locations easily. The camera also has a RJ-45 network port for connection via a LAN cable. The DCS-1000 camera appears to be the same camera without the WiFi capabilities.
For now, I have this camera on a small tripod pointing out my home's front window which allows me to watch the birds and squirrels, and anyone else approaching my home, all from my workplace. Included software allows you to press a button to record still images or movies, schedule these events, or use external triggers (motion sensors, door switches, etc.) to capture images and e-mail them to you. There are many possibilities.
What You Get
The camera is compact with dimensions of 6.5" L x 3.5" W x 2.25" H. It comes with 2 detachable antenna, power adapter, LAN cable, mounting
hardware, manual, and software CD. The back panel of the camera has a
network port and a switch to select wired, wireless, or both. Eight Input/Output
(I/O) connections allow for passive and active triggers which are not
included. A small reset button is also present which can also be used
to return to factory settings if necessary.
The front of the camera has the obvious lens which can be manually focused. There are also status LED's which indicate mode and connection status. These LED's can be turned off for more covert activity. The bottom of the camera has a mounting receptacle for the included straight and angled mounting posts and plate. It can also be used to attach to a standard tripod.
Setting It Up
The setup is fairly easy, however you do need to be familiar with TCP/IP
and a few basic networking concepts. The camera comes with a preset IP
number which probably doesn't match the scheme of your network or workstation.
You need to temporarily change a computer to match this scheme and connect
it to the camera directly via a "crossover" cable, or via a
network hub. At that moment, you will see that the camera is working by
using a web browser pointing to the default IP address. The first screen
shows a still image, and there are links to Java and ActiveX versions
of the video stream.
You can change the camera's IP address to fit into your existing network by assigning a static address or using DHCP. I opted for a static address since I was going to do some router mapping later. The camera can then be plugged into your existing network and accessed by its new IP address. After I had this working, I decided to tackle the wireless functions, and after a few attempts at the correct settings, I had the camera successfully connected to my U.S. Robotics wireless router. Total setup time, about 15 minutes.
Control and Operation
The camera is in essence, its own web server. Accessible via a browser,
the main page displays a current still image, and has links to video streaming,
and the control panel. Although immediately ready for use, you might want
to make some changes. I opted to turn off the camera's status LED's. You
can also assign an administrative password, and setup usernames and passwords
to restrict access to the camera. You can fine tune some of the image
controls like size, quality, brightness, etc. Setting the date and time
are helpful when recording and saving still photos with date formatted
filenames.
The camera stores no images, as there is no memory or hard drive, but you can configure access to an FTP site where you can schedule uploads or trigger them manually. This is also useful if you are unable to gain access directly to the camera from outside your network because of a firewall or router.
Once you have all your settings made, you simple access either the Java or ActiveX page options and watch away. Both provide you full motion video, display the camera's current time, and allow you to trigger image uploads. This is useful if you see something happening that you want to record. The Java option is immediately accessible by any Java compliant browser, but the ActiveX option needs a quick software component supplied on the existing CD. You can place that control on any accessible server and indicate it in the camera's configuration to have it automatically downloaded on first access for users. The ActiveX control is preferable, as I noticed the Java client was utilizing more system resources.
The camera works well, but don't expect TV quality. The lens has a focal length of 6.0mm and an aperature of f=1.8. It doesn't work well in night time conditions with low light. Minimal Illimunation is 2.5lux@F1.4 (if that means anything to you). What you do get is VGA quality images that work well at 320 x 240 pixels. (640 x 480 and 160 x 120 are also available) Clarity is handled by JPEG compression algorithms and is generally good. I could see birds on the bird feeder, but could not make out what species they were. Here is an example:

Access
The D-Link manual and website gives good guidance on how to setup your
network to access the camera from the outside world. Like many current
home setups, I have a cable modem and have connected a router to allow
other devices to share Internet Access and protect access to my computers.
Because of this, there seems to be no way to access the camera. What IP
address would one use? Enter the magic of port forwarding. Most broadband
routers allow different ports to be assigned to different IP addresses
on the network. The default port for the camera, and most web servers,
is port 80. However, most broadband companies filter this port to prevent
people setting up websites using their services. The key is to configure
the camera, and the router, to use an obscure (and arbitrary) port like
800. The URL to access the camera would look something like http://xxx.xxx.xxx.xxx:800.
You may find yourself needing some help with this, but it can be done.
Bottom Line
This camera has many features to take advantage of. The applications are
limited only by your imagination, and is a perfect addition to a home
network or business surveillance system.
Other Links:
TCP/IP, DNS, DHCP Explained
Other Reviews:
Canon Elph S400,
Game Boy Advance SP,
Palm i705,
Palm m100,
Palm m505,
Pen/Stylus Combo,
Pocket Printer,
Sony Digital Voice Recorder
DCS-1000W
D-Link Systems
List Price $329.00
Rating
![]()
Review by
Greg Renza
3/22/03
Get the DCS-1000
Wired Version at
Amazon.com